
How To Make Rounded Quilt Corners

Creating rounded corners on your quilt is a simple technique and adds another point of difference to make your quilt a little more special. Rounded corners can also be applied to other quilted goods including pot holders, coasters and many more. And the added bonus is your corners don’t have to perfectly miter your corners.
For a flatter and smoother corner, I'd suggest using biased binding, especially if you're working with smaller projects like coasters and pot holders. This is because the corners are smaller and need that additional stretch that bias binding can support. See example below when bias binding is not used on a smaller project.

See how the top corners sort of curl in the example above?
However I've got to be really honest with you, and in the example hung on the wall (the yellow quilt), I didn't use bias binding. For larger rounded corners like this, you can get away with not using bias binding. I also chose not to use bias binding on this occasion out of laziness.
P.S. if you like to make this quilt and pot holder in this example, you can grab the quilt patterns from my online store.
What you'll need

- Squared up quilt sandwich - Although we’ll be rounding up the corners, we still need to square up your quilt and form 90 degrees at each corner. This will ensure all your edges around the quilt are nice and straight once the rounded edges have been applied.
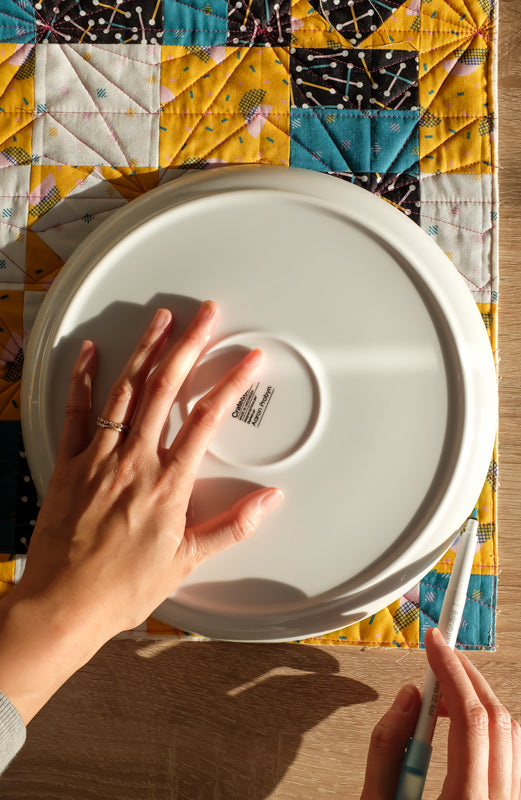
- A dinner plate to trace rounded edges - If you’re working on a smaller project for example pot holders, use a cup or a roll of tape to get a smaller rounded corner.
- Fabric pen or pencil
- Scissors
- Prepared binding
- Coordinating thread - In this tutorial I have used Aurifil 50wt Red Plum (1100) on the top, and Gold Yellow (5015) in the bobbin. Using different coloured threads on the top of the quilt and in the bobbin is totally optional, this is just another design consideration and could be applied to the quilting part of the quilt making process.
- Sewing machine
-
Prepared quilt binding
- Quilting ruler - preferably a smaller one, i.e. 6" x 6" but any size will do.
- Pins
Directions
*Tip: Trace the round edges on the quilt top instead of the back of the quilt to see what will be removed when the corners are trimmed.

Step 3: Use scissors to cut on the drawn guidelines.

Step 4: This step is attaching the binding on to the quilt. There are a couple of ways to attach binding on to a quilt: hand binding and machine binding. For this example, binding is machine binded. This method is faster and will hold up better.
Tip: Take your time when going around the round corners. The presser foot may need to be adjusted as you go around. If the presser foot needs to be adjusted, make sure the needle is down as you make these adjustments.
Step 4a: Start with the quilt back facing up. Align the raw edge of the binding with the raw edge of the quilt sandwich. Start sewing about 4" from the top of the binding and ¼" from the raw edges.

Step 4b: Keep sewing until you reach approx. 6" to 8" from the start of the binding. Then remove the quilt sandwich from the sewing machine.

Step 4c: Lay the quilt flat with the quilt back and the two ends of the binding strip facing up. Place the end of the binding on top of the start of the binding. Use a quilt ruler to mark ½" past the start of the binding, so the two ends overlap each other. Cut on the marked guideline.

Step 4d: With right sides together, pin and sew the two ends of the binding strip together using ¼" seam allowance and press the seams open.

Step 4e: Attach the rest of the binding to the back of the quilt.
Step 4f: You’re now in the home stretch! Fold the finished edge of the binding over to the quilt top and sew to secure it. When you reach the start of the binding, do not forget to backstitch to strengthen your binding.

