
Scandinavian Woven Star Ornaments + Gift Bows Tutorial

This project is perfect for kids and can be enjoyed with a tv show or movie that doesn’t require too much attention because there is no sewing machine involved. Though, in this version I’ll be incorporating decorative stitching with the sewing machine and Aurifil 50wt Thread. This is an additional step and is completely optional.
Another added bonus of this project is the opportunity to use up your scrap stash, especially those long strips of scraps from squaring up quilt backs.
Without further ado, let’s jump into the tutorial. First things first…
What you'll need

- Rotary cutter
- Cutting mat
- Quilting ruler
- At least four different coordinating quilting cotton fabrics – Each star requires four different fabrics. Each type of fabric cut into 3¼" x 12" strips. *
- Iron
- Ironing board or wool pressing mat
- Coordinating Aurifil Thread, 50wt (optional) – In this tutorial I used Red Plum (1100), Light Orchid (2515), Gold Yellow (5015)
- Coordinating Aurifil Thread, 12wt or embroidery thread – In this tutorial I used Light Jade (1148)
- Needle with an eye large enough for Aurifil Thread, 12wt or embroidery thread
*Tip: To speed things up, lay multiple pieces of fabric and cut more than one strip of fabric at a time.
Directions
Step 1: Fold and press each strip in half. Using the centre creased line as a guide, fold the edges to the centre and press again. Essentially creating a double-folded bias tape.

Step 2: This step is completely optional and is for decorative purposes. Jump to Step 3 if you do not want to add decorative stitching. Use coordinating thread (Aurifil Thread, 50wt) and sew approximately ⅛" from the edge to secure the layers and to prevent it from unfolding.
Feeling extra fancy? Add more decorative stitching to each strip. You can also introduce more than one coloured thread to create different textures and extra pizazz. Here are a few examples:

Don’t worry if the ends of your strips get a little messy after going through the sewing machine. The ends will be trimmed off or tucked away.

For the remainder of this tutorial, we’ll be weaving the four prepared strips. For crisper and pointer stars, I’d suggest pressing your strips as you fold and weave. This additional step will also make the weaving process easier and more accurate because it will stop the strips from shifting around as you’re working. Having an iron, wool pressing mat or ironing board nearby will be handy. Alternatively, finger press after each fold.
Step 3: Fold each strip almost in half – one end approx. 1"-1¼" longer than the other. Press the strip to hold the fold in place.

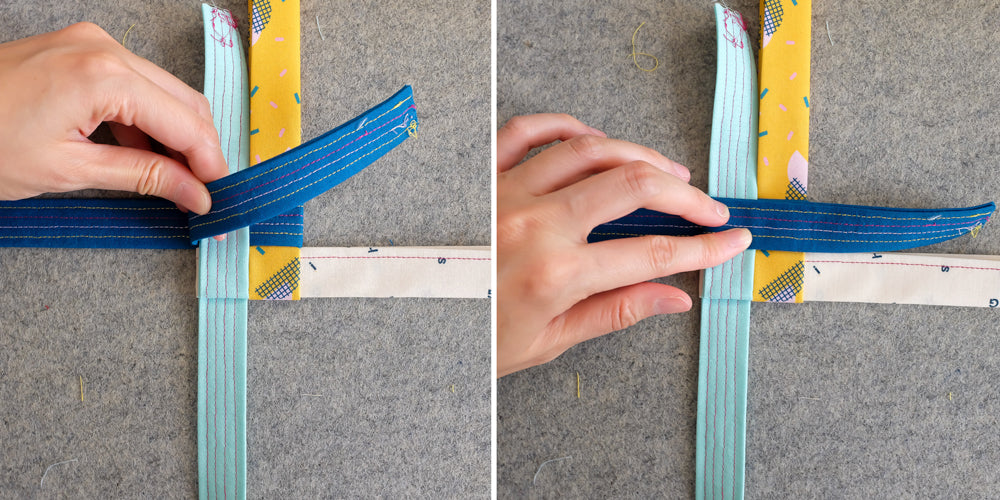
Step 4: Weave the four strips together. Each strip sandwiches the previous one and threads into the next strip. Make sure the shorter side of each strip is facing up at this step.
This sounds overwhelming so I’ve broken this step down in the following series of photos.


When you get to the final strip (dark blue), thread the ends through the bottom right quadrant (light blue) as shown in photos below.

Once you’ve got your strips in position, pull the ends of each strip to tighten the middle up. Once tightened, the four strips should hold together on its own. Imagine this as the foundation of your star (see below).

Step 5: Flip over the star. The longer sides of the strips should be facing up. Again, there is going to be more folding and looping. Similar to the previous step.
Start with the bottom left strip (light blue) and fold the longer side of the strip to the top left quadrant (dark blue) of the foundation. Press or hold it down to secure.

Take the top left strip (dark blue) and fold the longer side of the strip to the top right quadrant (dark blue) of the foundation. Press or hold it down to secure.
Take the top right strip (yellow) and fold the longer side of the strip to the bottom right quadrant (yellow) of the foundation. Press or hold it down to secure.

Take the longer side of the fourth strip (white) on the bottom left. Fold it to the bottom left quadrant (light blue), and tuck under and through loop of the bottom left quadrant (light blue).

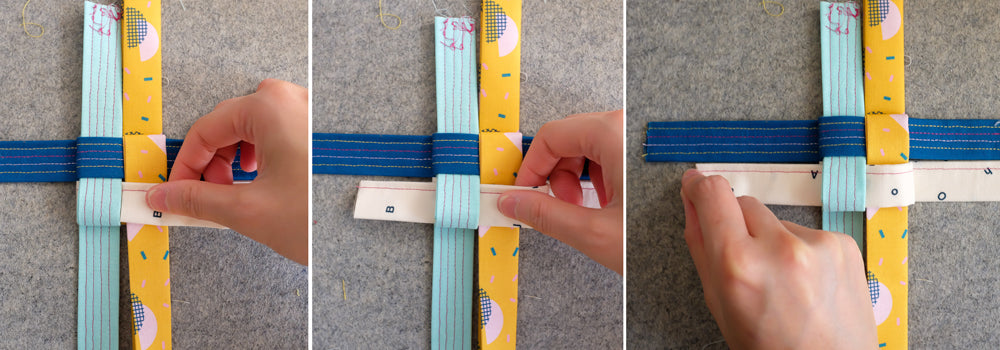

As per Step 4, pull the ends of each strip to tighten the middle up as shown in the photo above (right).
Step 6: Once you have tightened the middle up, remove excess fabric at the end of all strips to even out the ends. Careful not to take too much off. There needs to be approx. 3" of strip from the foundation of the star.


Step 7: This step covers the formation of the star’s points. All up, each star has 8 points. Step 7 will need to be repeated until all points are formed. But let’s not just worry about that yet, and jump into making the first point.
Looking at the 8 strips, there will be some coming from under and some coming from front of the star’s foundation (see below). 
Star this step with a strip from under the star’s foundation. Fold strip to form a 45-degree angle. The end of the strip will point away from the star’s foundation as per photo below. Use an iron or finger press the fold.
Flip the star over. With the same strip, fold another 45-degree angle as shown below. Use an iron or finger press the fold to secure it in place.
Then fold strip down to the centre of the star’s foundation. Press with an iron or finger to secure it in place.

Tuck loose end underneath the top right quadrant (dark blue) of the star’s foundation, and press with iron or finger to secure it in place and to create the first out of 8 points of the star.


Step 8: As previously mentioned, repeat Step 7 until all points of the star are covered.

Step 9: Give your star a good press to hold your folds in place and make those points nice a pointy.

Step 10: Use Aurifil Thread, wt12 or embroidery floss and needle to sew a loop to hang it up on your Christmas tree; or to thread ribbon or twine through for gifts.
Creating loop for Christmas tree ornament:
If you are making the loop for a Christmas tree, ensure loop is large enough to hang it on the tree. You may also want to consider using a darker green thread so it blends in with the foliage. Remove loose threads and enjoy.

Creating loop for gifts:
Create a loop with sewing needle and embroidery thread. Loop needs to be large enough to thread ribbon or twine through. Once the ribbon or twine is through the loop, pull the needle to tighten the loop to hold the ribbon or twine in place. Then tie a knot with your embroidery thread and needle to prevent the loop from coming undone. And don’t forget to remote any loose threads.


And there you have it! A Scandinavian woven fabric star.