
Sewing with Quilter's Grid Fusible Interfacing

I think many quilters would agree that accumulating scraps in your stash is easy, but using them in projects is such a struggle. Which is why I want to share with you a fairly recent discovery of mine (and it’s not new)… Quilter’s fusible grid interfacing (or webbing). When you’re done reading this tutorial, you’re going to want to start digging into your scrap box and create something with them. For simplicity, for the remainder of the tutorial I will be referring to the quilter’s fusible grid interfacing (or webbing) as “quilter’s grid interfacing” or “interfacing”.
Now you’re probably wondering, what is quilter’s grid interfacing... It is interfacing that comes pre-marked with grid lines. Depending on the manufacturer, grids come marked in increments varying from 1" to 2½". These grid lines are used as a guide to help lineup pieces of fabric before it gets fused or ironed on to the interfacing and sewn to create a block or panel. With quilters grid interfacing, you’re able to sew together small and multiple pieces of scraps at a time. This piecing technique makes tackling scraps quick, approachable and fun.
With the basics from this tutorial, you could do a lot with the scraps in your stash. For example, you could create multiple panels or blocks and combine it to create a larger project; quickly sew a ton of rectangles or squares to create a smaller project such as throw cushions, table runners; or cut up a ton of tiny squares and create a postage stamp quilt.
If you do choose to send your quilter’s grid project to a longarm quilter, double check that their machine is able to handle the additional thickness and weight. Speaking from experience, my longarm quilter (Orlando of Quiltysaurus) had to switch to a denim sewing needle and reduce the sewing speed due to the project’s thickness and weight.
This tutorial uses my Snap to Grid mini quilt pattern (finished size 15" square) as an example. There are a couple of ways in completing this project and transforming it into a wall hanging. I’d suggest checking out these two blog posts of mine when you just finish squaring up your mini quilt sandwich:
- Traditionally bind your quilt and create hang tabs on the back to slide a dowel rod and hang.
- Facing your quilt to give your quilt project a simple and clean finish by hiding the raw edges of a quilt sandwich without a visual frame like traditional quilt binding. This method also takes you through how to create tabs to slide a dowel rod for hanging.
What you'll need*

● Fusible quilters grid interfacing, one 20" square - In this tutorial, I used Pellon 820 Fusible Quilter's Grid
● Iron
● Wool pressing mat - preferably the biggest in size, i.e. 18" x 36"
● Rotary cutter
● Cutting mat
● Quilting ruler - varying sizes, i.e. 6" x 12 ", 6" x 24 "
● Coordinating thread(s) for piecing and quilting
● Scissors or snips for fabric
● Fabric - Fabric quantities are based on 42" WOF (width of fabric).
-
For quilt top:
Fabric A (background): 16 squares, 3½"
Fabric B (sashing): 24 rectangles, 1½" x 3½"
Fabric C (corner stones): 9 squares, 1½"
-
For quilt back:
¾ yard (96 cm)
-
For the binding:
Traditional binding method: 2 strips, 2½" x WOF
Facing quilt method: 4 rectangles, 2½" x 12"; 4 squares, 5"
Directions
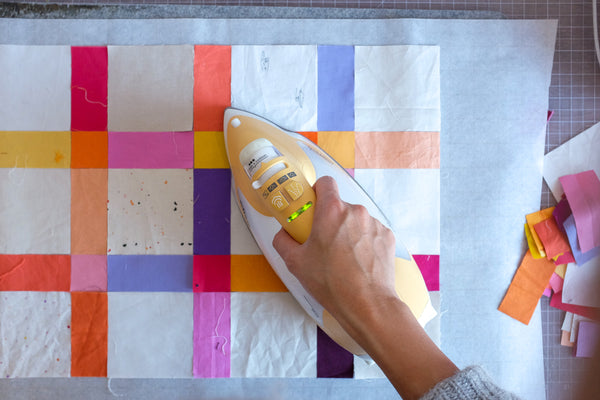
Step 1: Using the grid lines on the interfacing as a guide and following the diagram below, place the quilt top squares and rectangles on top of the quilters grid interfacing.* Ensure the wrong side of the fabric touches the adhesive side of the interfacing. Usually the adhesive side is the textured, bumpy side of the interfacing.

*Depending on how big your wool pressing mat is (or how big your interfacing panel is, if you’re working a larger project), you may consider auditioning all the quilt top squares and rectangles, and take a photo of it with your phone. Then refer to the photo, place and iron the quilt top square and rectangles on to the interfacing in batches. The ironing will take place in the next step.
Sewing with the quilter's grid interfacing is pretty forgiving, and it is okay if the quilt top squares and rectangles are a little wonky. Just do your best to get them straight. The sewing in the steps 3 and 6 will hide a lot of the imperfections.

Step 2: With a hot iron, carefully press the quilt top squares and rectangles into place. To ensure the quilt top squares and rectangles are held into place, hold the iron down a few seconds at a time to activate the interfacing adhesive, covering the entire panel. Don’t move the iron in a back and forth motion like you’d iron a shirt. That may shift the quilt top squares and rectangles.
To know that the quilt top squares and rectangles are fused and held in place, the fabric pieces stay intact when you pick up the interfacing.
Step 3: With right sides together, fold and crease the first column of squares and rectangles over to the second column of squares and rectangles. Sew ¼" away from the fold.


Repeat until all columns are sewn.

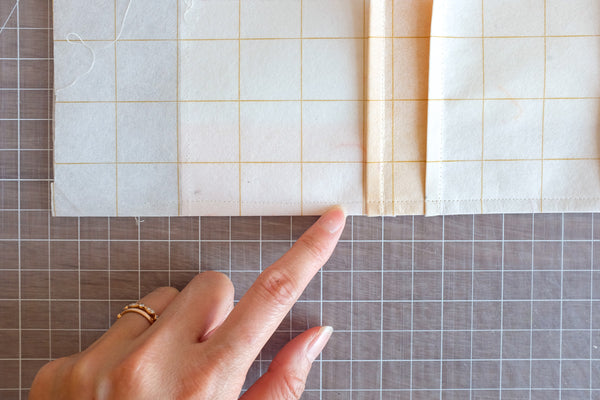
Step 4: Position the panel so the wrong side is facing up. With a pair of fabric scissors or snips, clip the interfacing at each intersection. Take extra care when clipping. Don’t clip the seam. Otherwise it would compromise the integrity of the panel.


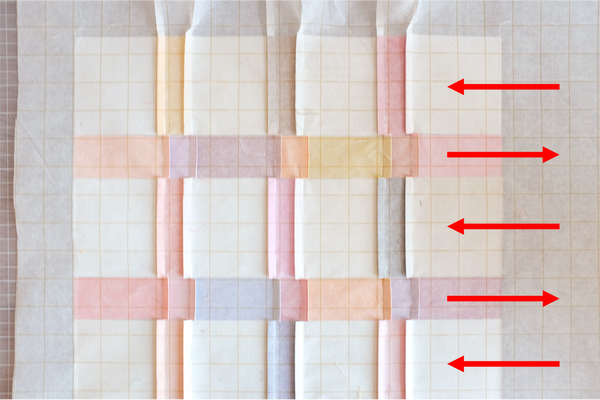
Step 5: With this technique, the seams can only be pressed to one side. To reduce seam bulk and to achieve nested seams, press every other row in the one direction and the remaining rows the opposite direction.
Step 6: Similar to step 3, fold and crease the first row of squares and rectangles over to the second row of squares and rectangles. Sew ¼" away from the fold.
Repeat until all rows are sewn.


Step 7: Press the rows to one side, all in the same direction.

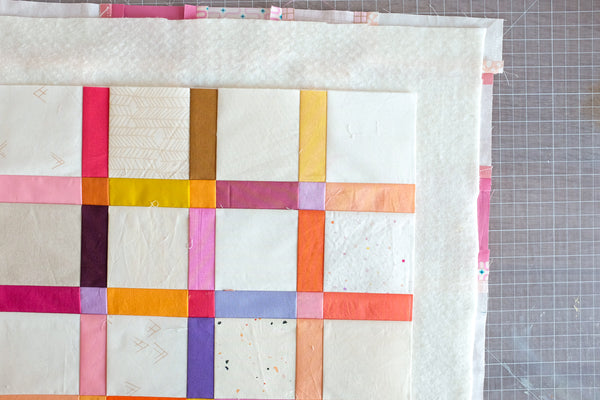
Step 8: With a ruler and rotary cutter, remove excess quilter’s grid interfacing.

Step 9: Press the quilt top and backing fabric. Layer the backing, batting and quilt top, and baste using the preferred method to create a quilt sandwich.
Step 10: Square quilt sandwich by trimming off excess quilt batting and backing fabric.

Step 11: Complete your mini quilt wall hanging with your preferred method. As previously mentioned, there are a couple of ways you could finish off your quilt and here are the blog posts with more detail on those methods:
- Traditionally bind your quilt and create hang tabs on the back to slide a dowel rod and hang.
- Facing your quilt to give your quilt project a simple and clean finish by hiding the raw edges of a quilt sandwich without a visual frame like traditional quilt binding. This method also takes you through how to create tabs to slide a dowel rod for hanging.

I hope this tutorial on sewing with quilter’s grid interfacing inspires you to dig into your scrap stash and turn them into something scrap-tacular!
*This post contains affiliate links. If you use these links to buy something we may earn a commission.